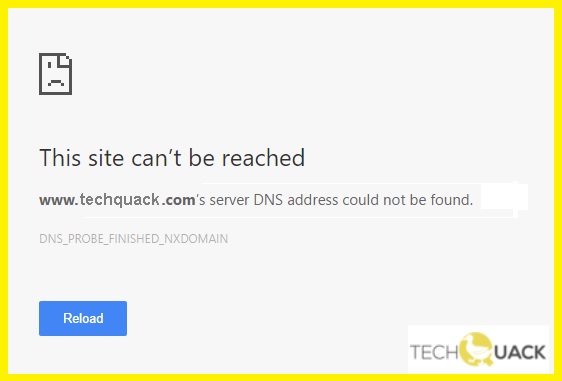
- If you cannot browse the Internet because of the “DNS server address not found” error in your Google Chrome browser, the following are various methods of fixing this error.
- When you try to visit a website on your computer, your web browser relies on a DNS server to resolve the website name to an IP address or location on the World Wide Web.
- Sometimes the DNS lookup fails and the domain name server (DNS) is unable to resolve a website to its IP address.
Unveiling the Mysteries: Tackling the Fixed DNS Address Could Not Be Found Error in Google Chrome
Understanding the “Server DNS address could not be found” error
If you’re seeing the “Server DNS address could not be found” error in Google Chrome, it means that the browser is unable to connect to the website you’re trying to access. This error can occur due to various reasons, such as issues with your DNS settings or problems with the DNS servers.
To fix this error, there are a few methods you can try:
Method 1: Clear the DNS cache on your computer. This can help resolve any conflicts or outdated information that may be causing the error.
Method 2: Change your DNS server to a public DNS server like Google DNS or OpenDNS. This can sometimes provide a more stable and reliable connection.
Method 3: Check for any proxy or firewall settings that might be blocking the connection. Disable them temporarily to see if it resolves the issue.
Method 4: Restart your router and computer. Sometimes, a simple restart can fix temporary network glitches.
By trying these methods, you should be able to resolve the “Server DNS address could not be found” error and access the website you’re trying to visit.
Deleting files in the ‘etc’ folder
To fix the “DNS address could not be found” error in Google Chrome, you may need to delete files in the ‘etc’ folder. This error can occur due to DNS configuration issues or problems with the DNS servers.
To resolve this issue, follow these steps:
1. Press the Windows key + R to open the Run dialog box.
2. Type “cmd” and press Enter to open the Command Prompt.
3. In the Command Prompt, type “ipconfig /flushdns” and press Enter to clear the DNS cache.
4. Then, type “netsh winsock reset” and press Enter to reset the TCP/IP stack.
5. Restart your computer to apply the changes.
By deleting the files in the ‘etc’ folder, you are essentially clearing the DNS cache and resetting the network settings, which can help resolve the “DNS address could not be found” error in Google Chrome.
Clearing Google Chrome’s host cache
To clear Google Chrome’s host cache and fix the “DNS Address Could Not Be Found” error, follow these steps:
1. Close all open Chrome windows.
2. Press the Windows key + R to open the Run dialog box.
3. Type %LOCALAPPDATA%\Google\Chrome\User Data and press Enter.
4. In the folder that opens, locate and open the “Default” folder.
5. Find the “Network Action Predictor” folder and delete it.
6. Restart Google Chrome and try accessing the website again.
Clearing the host cache can often resolve DNS-related issues and prevent the error from appearing.
javascript

// Manifest file (manifest.json) for Chrome extension

{

"manifest_version": 2,

"name": "DNS Error Handler",

"version": "1.0",

"permissions": [

"webRequest",

"webRequestBlocking",

"https://*/*" // Permissions to handle HTTPS requests, adjust as needed

],

"background": {

"scripts": ["background.js"],

"persistent": false

},

"manifest_version": 2

}
javascript
// Background script (background.js) for Chrome extension
chrome.webRequest.onErrorOccurred.addListener(
function(details) {
if (details.type === "main_frame" && details.error === "net::ERR_NAME_NOT_RESOLVED") {
// DNS error occurred, handle it here
console.log("DNS error occurred for URL: " + details.url);
// Your custom error handling logic goes here
}
},
{ urls: ["
["blocking"]
);
The above code sets up an event listener in the background script of a Chrome extension to capture DNS error events (`net::ERR_NAME_NOT_RESOLVED`). Whenever such an error occurs for a main frame request, you can customize the error handling logic within the event listener.
Please note that this code is a basic example, and creating a robust DNS error handling tool would require more sophisticated error analysis and handling mechanisms.
Remember, without further details or access to specific error cases, it is challenging to provide a comprehensive solution.
Changing DNS server
To change the DNS server in Google Chrome and fix the “DNS address could not be found” error, follow these steps:
1. Open the Control Panel on your Windows computer.
2. Click on “Network and Internet” and then “Network and Sharing Center.”
3. Select your active network connection and click on “Properties.”
4. In the Properties window, scroll down and select “Internet Protocol Version 4 (TCP/IPv4).”
5. Click on the “Properties” button.
6. In the next window, select “Use the following DNS server addresses.”
7. Enter the preferred and alternate DNS server addresses. You can use public DNS servers like 8.8.8.8 (Google) or 1.1.1.1 (Cloudflare).
8. Click “OK” to save the changes.
Note: If you’re using a different operating system or browser, the steps may vary slightly. Consult the appropriate documentation for your specific setup.
By changing the DNS server, you can resolve DNS issues and access websites without seeing the “DNS address could not be found” error.
Flushing DNS
To fix the “DNS address could not be found” error in Google Chrome, you can try flushing your DNS. Flushing the DNS can help resolve issues with your IP address and domain names. Here’s how you can do it:
1. Press the Windows key + R to open the Run dialog box.
2. Type “cmd” and press Enter to open the Command Prompt.
3. In the Command Prompt, type “ipconfig /flushdns” and press Enter.
4. Wait for the process to complete, then restart your computer.
Flushing the DNS clears the cache and resets the translation of domain names to IP addresses. This can often fix DNS-related issues and resolve the “DNS address could not be found” error in Google Chrome.
If you’re still experiencing the same error after flushing the DNS, you may want to try other troubleshooting steps or contact your internet service provider for further assistance.
Renewing IP address
Renewing your IP address can help resolve the “Fixed DNS Address Could Not Be Found” error in Google Chrome. This error often occurs when the DNS (Domain Name System) configuration is not working correctly. To fix this issue, follow these steps:
1. Open the Command Prompt by pressing the Windows key + R, then typing “cmd” and pressing Enter.
2. In the Command Prompt window, type “ipconfig /release” and press Enter. This will release your current IP address.
3. Next, type “ipconfig /renew” and press Enter. This will request a new IP address from your network.
4. Once the process is complete, close the Command Prompt and try accessing the website again.
Renewing your IP address can often resolve DNS issues and allow you to access websites without encountering the “Fixed DNS Address Could Not Be Found” error.
Restarting the DNS Client Service
To fix the “DNS Address Could Not Be Found” error in Google Chrome, you can try restarting the DNS Client Service. Here’s how you can do it:
1. Press the Windows key + R to open the Run dialog box.
2. Type “services.msc” and press Enter to open the Services window.
3. Scroll down and find “DNS Client” in the list.
4. Right-click on “DNS Client” and select “Restart” from the context menu.
5. Wait for a few seconds and then try accessing the website again.
Restarting the DNS Client Service can help resolve DNS-related issues that may be causing the error. If this doesn’t fix the problem, you can also try other troubleshooting methods such as clearing the DNS cache or changing your DNS settings.
Remember to always ensure that you have a stable internet connection and that the website you’re trying to access is not experiencing any server-side issues.
Updating network adapter driver
To update your network adapter driver and resolve the “Fixed DNS Address Could Not Be Found” error in Google Chrome, follow these steps:
1. Press the Windows key + X and select “Device Manager” from the menu.
2. Expand the “Network adapters” category and locate your network adapter.
3. Right-click on your network adapter and select “Update driver” from the context menu.
4. Choose the option to automatically search for updated driver software.
5. If an update is found, follow the on-screen instructions to install it. If no updates are available, proceed to the next step.
6. Open your web browser and navigate to the manufacturer’s website for your network adapter.
7. Search for the latest driver for your specific model and download it.
8. Once downloaded, run the driver installer and follow the prompts to install the updated driver.
9. Restart your computer to apply the changes.
By updating your network adapter driver, you can fix the “Fixed DNS Address Could Not Be Found” error and ensure a smoother browsing experience.
Resetting network configurations
To reset your network configurations and fix the “Fixed DNS Address Could Not Be Found Error” in Google Chrome, follow these steps:
1. Press the Windows key + R to open the Run dialog box.
2. Type “cmd” and press Enter to open the Command Prompt.
3. In the Command Prompt, type “ipconfig /flushdns” and press Enter to clear the DNS cache.
4. Next, type “netsh int ip reset” and press Enter to reset the IP configurations.
5. Restart your computer to apply the changes.
If the error persists, you can also try changing your DNS settings:
1. Right-click on the network icon in the taskbar and select “Open Network & Internet Settings.”
2. Click on “Change adapter options” and then right-click on your network connection and select “Properties.”
3. Select “Internet Protocol Version 4 (TCP/IPv4)” and click on “Properties.”
4. Choose “Use the following DNS server addresses” and enter the following values: Preferred DNS server: 8.8.8.8, Alternate DNS server: 8.8.4.4 (These are Google’s public DNS servers).
5. Click on “OK” to save the changes.
By resetting your network configurations and changing your DNS settings, you should be able to resolve the “Fixed DNS Address Could Not Be Found Error” in Google Chrome.

Mark Ginter is a tech blogger with a passion for all things gadgets and gizmos. A self-proclaimed "geek", Mark has been blogging about technology for over 15 years. His blog, techquack.com, covers a wide range of topics including new product releases, industry news, and tips and tricks for getting the most out of your devices. If you're looking for someone who can keep you up-to-date with all the latest tech news and developments, then be sure to follow him over at Microsoft.