- Many Windows users report that they can no longer boot normally.
- Problem is mostly reported in Windows 10, but it is not exclusive to that version of Windows.
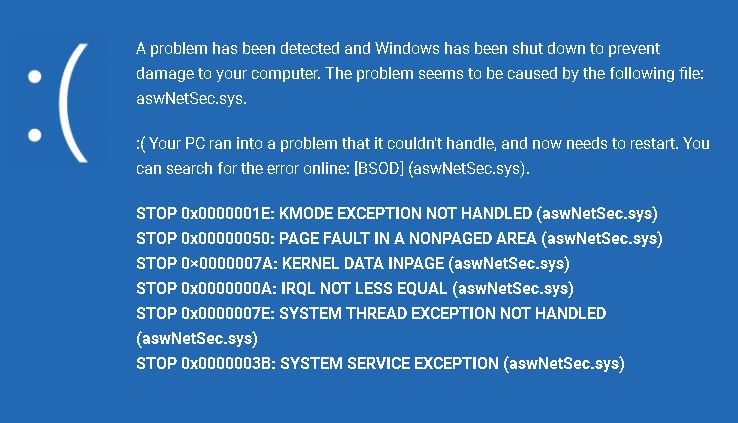
- D (Blue Screen of Death) identifies the aswNetSec.sys file as the file responsible for the critical system error.
- It turns out that several scenarios can cause this type of BSOD.
Unmasking the Culprit: Troubleshooting the Dreaded aswNetSec.sys in BSOD Errors
Understanding the Causes of aswNetSec.sys BSOD
If you are experiencing a Blue Screen of Death (BSOD) error caused by the aswNetSec.sys file, there are a few steps you can take to fix the issue.
First, try booting your PC in Safe Mode to see if the problem persists. If it doesn’t, there may be a third-party antivirus software causing the conflict. Consider uninstalling any recently installed antivirus programs.
Another possible solution is to update your Avast antivirus software to the latest version. Sometimes older versions can cause compatibility issues with the system.
You can also try running a system scan using a reliable antivirus tool, such as Avast or MiniTool Partition Wizard, to check for any potential malware or system corruption problems.
If none of these solutions work, you may need to seek further assistance or consult Microsoft’s support forums for more specific troubleshooting steps.
Restoring Your Computer with Last Restore Point
If you’re experiencing BSOD errors caused by aswNetSec.sys, you can try restoring your computer to a previous working state using the last restore point. This can help resolve the issue and get your PC back up and running smoothly.
To restore your computer with the last restore point:
1. Restart your computer and enter Safe Mode. Press F8 repeatedly during startup.
2. Once in Safe Mode, open the Start menu and search for “System Restore.”
3. Click on “System Restore” to open the tool.
4. Select the option to restore your computer to the last restore point.
5. Follow the on-screen instructions to complete the restoration process.
6. After the restoration is complete, restart your computer and check if the BSOD errors caused by aswNetSec.sys have been resolved.
Restoring your computer to a previous restore point can help fix issues caused by system file corruption or conflicting software. If the problem persists, you may need to consider other troubleshooting methods or seek further assistance.
Checking Your Hard Drive in Safe Mode
To check your hard drive in Safe Mode, follow these steps:
1. Restart your computer and continuously press the F8 key until the Advanced Boot Options menu appears.
2. Use the arrow keys to select “Safe Mode with Command Prompt” and press Enter.
3. Once in Safe Mode, press the Windows key + R to open the Run dialog box.
4. Type “cmd” and press Enter to open the Command Prompt.
5. In the Command Prompt, type “chkdsk /f” and press Enter to start the disk check process.
6. Wait for the scan to complete. If any errors are found, the utility will attempt to fix them.
7. Once the scan is finished, restart your computer and check if the BSOD error is resolved.
Checking your hard drive in Safe Mode can help identify and fix any issues that may be causing the BSOD errors. It is an effective troubleshooting method that can help resolve system crashes and errors.
powershell

# Run PowerShell with administrative privileges to execute the following script
# Disable the aswnetsec.sys driver
Set-Service -Name aswnetsec -StartupType Disabled
# Stop the aswnetsec.sys driver if it is currently running
Stop-Service -Name aswnetsec -Force
This script sets the “aswnetsec” service startup type to “Disabled” and stops the service forcefully, if it is currently running. Note that this code assumes that the service name is “aswnetsec.” Please verify the correct service name before executing the script.
Again, it is crucial to exercise caution when modifying system files and services. This code is only a basic example and may not resolve all issues related to the “aswnetsec.sys” file. If you continue to experience problems or require more advanced assistance, I recommend contacting official support or seeking help from a professional with expertise in debugging BSOD errors.
Running SFC and CHKDSK to Fix Errors
To fix BSOD errors caused by aswNetSec.sys, you can try running the System File Checker (SFC) and the Check Disk (CHKDSK) utility. These tools can help identify and repair any corrupted system files that may be causing the crashes.
To run the SFC command, press the Windows key + X, and select “Command Prompt (Admin)” or “Windows PowerShell (Admin).” Then, type “sfc /scannow” and press Enter. This will scan your system for any corrupted files and attempt to repair them.
Next, you can run CHKDSK to check the integrity of your hard drive. Open Command Prompt as an administrator and type “chkdsk C: /f /r” (replace “C” with the drive letter where your Windows is installed) and press Enter. This will scan and repair any disk errors.
Remember to restart your computer after running these commands to apply the fixes. If the BSOD errors persist, it may be helpful to seek further assistance from a professional or contact Microsoft support.
Uninstalling Third-Party Antivirus Programs
- Introduction: Understanding the need to remove third-party antivirus programs causing BSOD errors
- Step 1: **Identifying the problematic antivirus software**: Check for any third-party antivirus programs installed on your system
- Step 2: **Research the software**: Gather information about the antivirus program causing the aswNetSec.sys BSOD error
- Step 3: **Disabling the antivirus software**: Temporarily turn off or disable the problematic antivirus program
- Step 4: **Uninstalling the antivirus software**: Utilize the built-in Windows uninstallation tool to remove the third-party antivirus program
- Step 5: **Cleaning up remnants**: Use a reliable software removal tool to ensure complete removal of any leftover files or registry entries
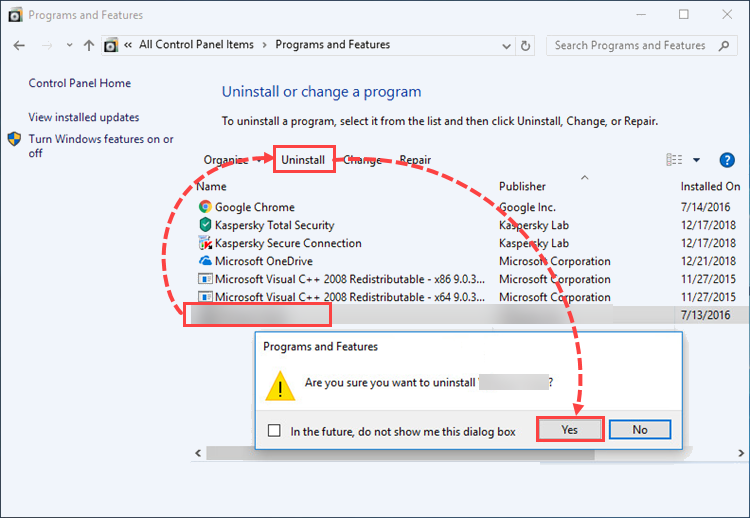
- Step 6: **Restart your system**: Reboot your computer to finalize the removal process
- Step 7: **Install Windows Defender**: Enable Windows Defender or any other reputable antivirus solution to safeguard your system
- Conclusion: Resolving aswNetSec.sys BSOD errors by effectively removing third-party antivirus programs
Performing a Repair Install
1. Start by booting your computer into Safe Mode. Press the Windows key + R, type “msconfig”, and hit Enter. In the System Configuration window, go to the Boot tab and check the “Safe boot” option. Click Apply and OK, then restart your computer.
2. Once in Safe Mode, open your preferred web browser and navigate to the Microsoft website. Download the Windows 10 Media Creation Tool.
3. Run the Media Creation Tool and select “Upgrade this PC now.” Follow the on-screen instructions to complete the installation process.
4. After the repair install is finished, restart your computer and check if the BSOD errors caused by aswNetSec.sys have been resolved.
5. If the issue persists, try uninstalling any third-party antivirus software or firewalls that may be conflicting with your system. Press the Windows key + X, select “Device Manager,” expand the “Network Adapters” category, right-click on “aswNetSec.sys,” and choose “Uninstall.”
6. Reboot your computer and check for any improvements. If the problem still persists, consider seeking further assistance from Microsoft support or a professional technician.
Using Automatic Repair Tools and Repairing Corrupted System Files
If you are experiencing BSOD errors caused by the aswNetSec.sys file, you can use automatic repair tools and repair corrupted system files to resolve the issue.
To start, you can use the built-in Automatic Repair tool in Windows 10 or Windows 8.1. Simply restart your computer and let the tool scan for and fix any issues that may be causing the BSOD errors.
If the automatic repair tool doesn’t fix the problem, you can try repairing corrupted system files using the System File Checker (SFC) tool. To do this, open Command Prompt as an administrator and type “sfc /scannow“. Press Enter and let the tool scan and repair any corrupted files it finds.
Another option is to use a third-party tool like MiniTool Partition Wizard to check and repair disk errors.
By following these steps, you can fix BSOD errors caused by the aswNetSec.sys file and get your system back up and running smoothly.
Updating Avast and Windows, and Updating Drivers
Fixing BSOD Errors Caused by aswNetSec.sys
If you are experiencing BSOD (Blue Screen of Death) errors caused by aswNetSec.sys, it is important to update Avast, Windows, and the necessary drivers to resolve the issue. Follow the steps below to ensure your system is up to date:
Updating Avast
| Step | Description |
|---|---|
| 1 | Open Avast Antivirus on your computer. |
| 2 | Click on the Menu icon (represented by three horizontal lines) in the top-right corner of the Avast window. |
| 3 | Select “Settings” from the dropdown menu. |
| 4 | In the Settings window, choose the “Update” tab. |
| 5 | Click on the “Update” button to check for the latest Avast updates. |
| 6 | If updates are available, click on the “Update” button to install them. |
Updating Windows
| Step | Description |
|---|---|
| 1 | Click on the Start menu and open the Settings app. |
| 2 | Select “Update & Security” from the available options. |
| 3 | In the Windows Update section, click on the “Check for updates” button. |
| 4 | If updates are found, click on the “Install now” button to install them. |
| 5 | Restart your computer to complete the installation of updates. |
Updating Drivers
| Step | Description |
|---|---|
| 1 | Identify the specific driver that needs to be updated. It is often mentioned in the BSOD error message. |
| 2 | Visit the official website of the driver manufacturer. |
| 3 | Locate the “Support” or “Downloads” section on the website. |
| 4 | Search for the driver using the model number or name. |
| 5 | Download the latest version of the driver compatible with your operating system. |
| 6 | Install the downloaded driver by following the on-screen instructions. |

Mark Ginter is a tech blogger with a passion for all things gadgets and gizmos. A self-proclaimed "geek", Mark has been blogging about technology for over 15 years. His blog, techquack.com, covers a wide range of topics including new product releases, industry news, and tips and tricks for getting the most out of your devices. If you're looking for someone who can keep you up-to-date with all the latest tech news and developments, then be sure to follow him over at Microsoft.