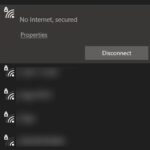
- A common network error in Windows is the “Wifi does not have a valid IP configuration” error message.
- This is one of the few Windows network errors for which there is no automatic solution.
- The problem can be caused by a faulty network, improper network settings, hardware issues, problems with your carrier’s network, disabling Windows network services, etc.
- If you still get the error, you need to uninstall and reinstall the wireless network adapter on your computer.
Unveiling the Solution: Troubleshooting WiFi’s Invalid IP Configuration
Restart your router
Restarting your router can often resolve Wi-Fi issues, including the “Wi-Fi doesn’t have a valid IP configuration” error. To do this, follow these steps:
1. Disconnect the power cable from your router or modem.
2. Wait for about 30 seconds.
3. Plug the power cable back into the router or modem.
4. Wait for the router or modem to fully restart, which may take a few minutes.
After the restart, check if your Wi-Fi connection is working. If the issue persists, try these additional troubleshooting tips:
1. Press the Windows key + R, then type “ncpa.cpl” and press Enter.
2. Right-click on your network adapter and select “Disable.”
3. Wait a few seconds, then right-click on the network adapter again and select “Enable.”
If the problem still persists, you can try resetting your IP configuration using Command Prompt:
1. Press the Windows key + X and select “Command Prompt (Admin).”
2. Type the following commands, pressing Enter after each one:
netsh winsock reset
netsh int ip reset
ipconfig /release
ipconfig /renew
ipconfig /flushdns
These steps should help resolve common IP configuration errors and get your Wi-Fi connection back up and running.
Change the Router’s SSID and Password
To change the router’s SSID and password, follow these steps:
1. Open a web browser and enter your router’s IP address in the address bar. Typically, the default IP address is “192.168.1.1.”
2. Enter your router’s username and password to log in. If you haven’t changed them before, consult your router’s manual or check the manufacturer’s website for default login credentials.
3. Once logged in, navigate to the wireless settings or wireless configuration page. Look for options related to SSID or network name and password.
4. Enter a new SSID and password of your choice. Make sure to use a strong password to enhance security.
5. Save the changes and wait for the router to restart. This may take a few moments.
6. Once the router has restarted, reconnect your devices to the wireless network using the new SSID and password.
Remember to update the SSID and password on all your devices that connect to the wireless network.
By following these steps, you can easily change the router’s SSID and password, ensuring a secure and personalized wireless network.
Check if Network Service Is Running
To check if the Network Service is running on your computer, follow these troubleshooting tips:
1. Press Windows+R to open the Run window.
2. Type “services.msc” and press Enter to open the Services window.
3. Scroll down and locate the “Network Location Awareness” service.
4. Right-click on it and select “Properties”.
5. In the Properties window, ensure that the “Startup type” is set to “Automatic”.
6. If the service is not running, click on “Start” to start it.
7. Click “Apply” and then “OK” to save the changes.
This will ensure that the Network Service is running and can help fix the “WiFi doesn’t have a valid IP configuration” error. If the issue persists, you can try resetting the IP configuration by following these steps:
1. Press Windows+R to open the Run window.
2. Type “cmd” and press Enter to open the Command Prompt.
3. In the Command Prompt, type “ipconfig /release” and press Enter.
4. Then, type “ipconfig /renew” and press Enter.
5. Finally, type “ipconfig /flushdns” and press Enter.
These commands will reset your IP configuration and may resolve the issue. If the problem still persists, it is recommended to seek further assistance or consult a professional.
python

import subprocess
def diagnose_wifi_issue():
try:
# Reset network adapter
subprocess.run(['netsh', 'interface', 'ip', 'reset'])
# Release and renew IP address
subprocess.run(['ipconfig', '/release'])
subprocess.run(['ipconfig', '/renew'])
print("WiFi configuration reset and IP address renewed successfully.")
except Exception as e:
print("An error occurred while diagnosing the WiFi issue:", str(e))
# Usage
diagnose_wifi_issue()
Please note that this code only covers a basic approach to resetting the network adapter and renewing the IP address. It may not solve all possible causes of the error and may require additional troubleshooting steps.
Restart your computer with a clean boot
To fix the “WiFi Doesn’t Have a Valid IP Configuration” error, you can try restarting your computer with a clean boot. This process helps identify and eliminate any software conflicts that may be causing the issue.
Here’s how to do it:
1. Press the Windows key + R to open the Run dialog box.
2. Type “msconfig” and hit Enter to open the System Configuration window.
3. In the General tab, select “Selective startup” and uncheck “Load startup items.”
4. Go to the Services tab, check the “Hide all Microsoft services” box, and click “Disable all.”
5. Navigate to the Startup tab and click “Open Task Manager.”
6. In the Task Manager, disable all the startup programs by right-clicking on each one and selecting “Disable.”
7. Close the Task Manager and go back to the System Configuration window. Click “OK” and then “Restart.”
After your computer restarts, check if the “WiFi Doesn’t Have a Valid IP Configuration” error is resolved. If it is, you can gradually enable the disabled services and startup items to identify the one causing the issue.
Remember to enable your antivirus software and other essential services.
This clean boot process can help troubleshoot and fix network errors, ensuring a functioning IP configuration on your PC.
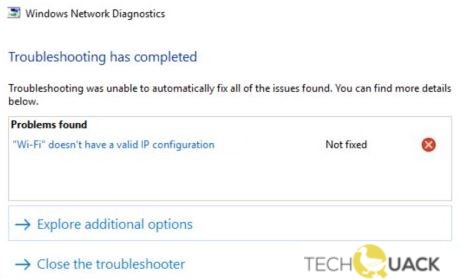
Run the Network troubleshooter
To fix the “WiFi Doesn’t Have a Valid IP Configuration” error, you can use the Network Troubleshooter tool in Windows 10. Here’s how:
1. Press the Windows key + R to open the Run dialog box.
2. Type ncpa.cpl and press Enter to open the Network Connections window.
3. Right-click on your wireless network adapter and select Diagnose.
4. The Network Diagnostic Tool will run and attempt to fix any issues with your network connection.
5. Follow the prompts and let the tool diagnose and repair the problem.
6. Once the tool has finished, check if the “WiFi Doesn’t Have a Valid IP Configuration” error message is resolved.
In some cases, the Network Troubleshooter may not be able to fix the issue. If that’s the case, you can try resetting the IP configuration by using the following steps:
1. Press the Windows key + R to open the Run dialog box.
2. Type cmd and press Enter to open the Command Prompt.
3. In the Command Prompt window, type the following commands one by one, pressing Enter after each one:
– ipconfig /release
– ipconfig /renew
– ipconfig /flushdns
4. After executing these commands, restart your PC and check if the issue is resolved.
By following these steps, you should be able to fix the “WiFi Doesn’t Have a Valid IP Configuration” error and restore your internet connection.
Reset IP Configuration on Network Adapter
Resetting the IP configuration on a network adapter can help fix the “WiFi Doesn’t Have a Valid IP Configuration” error. To reset the IP configuration, follow these steps:
1. Press the Windows key + R to open the Run dialog box.
2. Type ncpa.cpl and press Enter to open the Network Connections window.
3. Right-click on your wireless network adapter and select Disable.
4. Wait a few seconds and then right-click on the adapter again and select Enable.
5. Open the Network Diagnostic Tool by pressing the Windows key + R, typing msdt.exe /id NetworkDiagnosticsWeb, and pressing Enter.
6. Follow the on-screen instructions to diagnose and fix any network errors.
In some cases, resetting the IP configuration can resolve the “WiFi Doesn’t Have a Valid IP Configuration” issue and restore a functioning IP. If the problem persists, you may need to reinstall the wireless network adapter driver or seek further assistance. Remember to restart your computer after performing these steps.
Temporarily disable your antivirus
To temporarily disable your antivirus software, follow these steps:
1. Open the antivirus software on your Windows 10 computer.
2. Look for an option to disable or turn off the antivirus protection.
3. Click on the option to disable the antivirus temporarily.
4. Confirm any prompts or warnings that appear.
5. Once the antivirus is disabled, try connecting to your WiFi network again to see if the “WiFi doesn’t have a valid IP configuration” error is resolved.
Remember to re-enable your antivirus software after troubleshooting the network error to ensure your computer remains protected.
If you’re still experiencing the IP configuration error message, you may need to try other solutions such as resetting your IP configuration or reinstalling your wireless network adapter driver. For a comprehensive guide on troubleshooting this issue, refer to the Windows support website or consult with a technology professional.
By temporarily disabling your antivirus, you can rule out any potential conflicts between the software and your network connection, helping you identify the root cause of the problem.
Set the channel’s width to Auto (Obtain the IP Address Automatically)
To fix the “WiFi Doesn’t Have a Valid IP Configuration” error, one possible solution is to set the channel’s width to Auto and obtain the IP address automatically. Here’s how:
1. Press the Windows key + R to open the Run dialog box.
2. Type ncpa.cpl and press Enter to open the Network Connections window.
3. Right-click on your wireless network adapter and select Properties.
4. In the Properties window, click on the Networking tab.
5. Under the “This connection uses the following items” section, select Internet Protocol Version 4 (TCP/IPv4) and click on the Properties button.
6. In the Internet Protocol Version 4 (TCP/IPv4) Properties window, make sure the options “Obtain an IP address automatically” and “Obtain DNS server address automatically” are both selected.
7. Click OK to save the changes and close all windows.
8. Restart your computer and check if the issue is resolved.
By setting the channel’s width to Auto and obtaining the IP address automatically, you can potentially resolve the “WiFi Doesn’t Have a Valid IP Configuration” error and regain a stable internet connection.
Update the Wireless Network Adapter Drivers
To update the wireless network adapter drivers and resolve the “WiFi doesn’t have a valid IP configuration” error, follow these steps:
1. Press the Windows key + R to open the Run dialog box.
2. Type ncpa.cpl and press Enter to open the Network Connections window.
3. Right-click on your wireless network adapter and select Properties.
4. In the Properties window, click on the Driver tab.
5. Click on the Update Driver button to start the driver update process.
6. Choose the option to automatically search for updated driver software.
7. Windows will search for and install the latest driver for your wireless network adapter.
8. Once the driver update is complete, restart your computer to apply the changes.
Updating the wireless network adapter drivers can help resolve issues with the IP configuration and improve the stability of your WiFi connection. Following these steps ensures that your device is using the latest drivers available, ensuring optimal performance and connectivity.
Perform a Network Reset
Performing a network reset can help resolve the “WiFi doesn’t have a valid IP configuration” error message. To reset your network settings, follow these steps:
1. Press the Windows key + R to open the Run dialog box.
2. Type ncpa.cpl and press Enter to open the Network Connections window.
3. Right-click on your wireless network adapter and select Disable. If you’re using an Ethernet connection, disable the Ethernet adapter instead.
4. Wait for a few seconds, then right-click on the adapter again and select Enable.
5. Once the adapter is enabled, right-click on it and select Properties.
6. In the Properties window, scroll down and select Internet Protocol Version 4 (TCP/IPv4).
7. Click on the Properties button and make sure both options are set to obtain an IP address automatically.
8. Click OK to save the changes and close the windows.
Performing a network reset can help resolve IP configuration errors and restore your network connection. This simple troubleshooting step can be helpful for Windows users experiencing network issues.

Mark Ginter is a tech blogger with a passion for all things gadgets and gizmos. A self-proclaimed "geek", Mark has been blogging about technology for over 15 years. His blog, techquack.com, covers a wide range of topics including new product releases, industry news, and tips and tricks for getting the most out of your devices. If you're looking for someone who can keep you up-to-date with all the latest tech news and developments, then be sure to follow him over at Microsoft.