- Error code 0x80300024 is one of those annoying errors you see pop up while trying to install Windows 10.
- This error usually happens because there is not enough free space on the hard disk partition where you want Windows 10 to be installed.
- You can fix this error by creating an additional empty partition on the same hard disk.
- For example, if you recently installed a new.
- D, you might want to run some tests to make sure it’s working correctly.
Welcome to our easy guide on solving Windows Error 0x80300024 during installation. Discover simple and effective solutions to overcome this frustrating obstacle and ensure a smooth installation process.
Removing unnecessary hard drives during Windows installation
During the Windows installation process, you may encounter the error code 0x80300024, which prevents the installation from proceeding. This error usually occurs when unnecessary hard drives are connected to your PC. To fix this issue, follow these steps:
1. Start by disconnecting any additional hard drives or media drives from your computer.
2. Restart the installation process and select your preferred language, time, and keyboard settings.
3. When you reach the “Where do you want to install Windows?” screen, you should no longer see the error 0x80300024.
4. If the error persists, access your computer’s BIOS by pressing the appropriate key during startup (refer to your computer’s manual or vendor list for the specific key).
5. In the BIOS settings, navigate to the “Boot” or “Startup” section and prioritize the hard disk partition where you want to install Windows.
6. Save the changes and exit the BIOS.
7. Retry the installation process, and this time the error should be resolved.
Trying different USB ports for the installation media
If you encounter Windows Error 0x80300024 when installing, trying different USB ports for the installation media may solve the issue. Here’s a quick and easy guide to help you:
1. Start by plugging your USB drive into a different USB port on your PC. Sometimes, certain ports may have compatibility issues.
2. If the error persists, try using a different USB port altogether. This can help rule out any problems with a specific port.
3. Ensure that the USB drive is properly inserted and recognized by your computer. Check the device manager to make sure it is detected.
4. If you’re still experiencing the error, you can try using a different USB drive. Sometimes, the issue may be with the drive itself.
Remember to try each method one at a time and restart your PC after making any changes. Hopefully, this guide helps you resolve the Windows Error 0x80300024 and successfully complete your installation.
Setting the Windows installer as the boot device
To set the Windows installer as the boot device and solve Windows Error 0x80300024 when installing, follow these easy steps:
1. Restart your computer and enter the BIOS settings. Press the BIOS key (refer to your computer’s manual for the specific key) as soon as the system starts.
2. In the BIOS settings, navigate to the Boot tab or menu.
3. Look for the option to change the boot order or set the boot device. Select the media drive (e.g., USB or DVD drive) where you have the Windows installation files.
4. Move the selected media drive to the top of the boot order list. This ensures the computer boots from the Windows installer.
5. Save your changes and exit the BIOS settings.
Now, your computer will boot from the Windows installer, allowing you to proceed with the installation process without encountering the 0x80300024 error. Remember to follow the on-screen instructions to complete the installation successfully.
Formatting the installation location by deleting partitions
- Start by accessing the Windows installation setup.
- When prompted to select an installation location, choose the existing partition or drive where you want to install Windows.
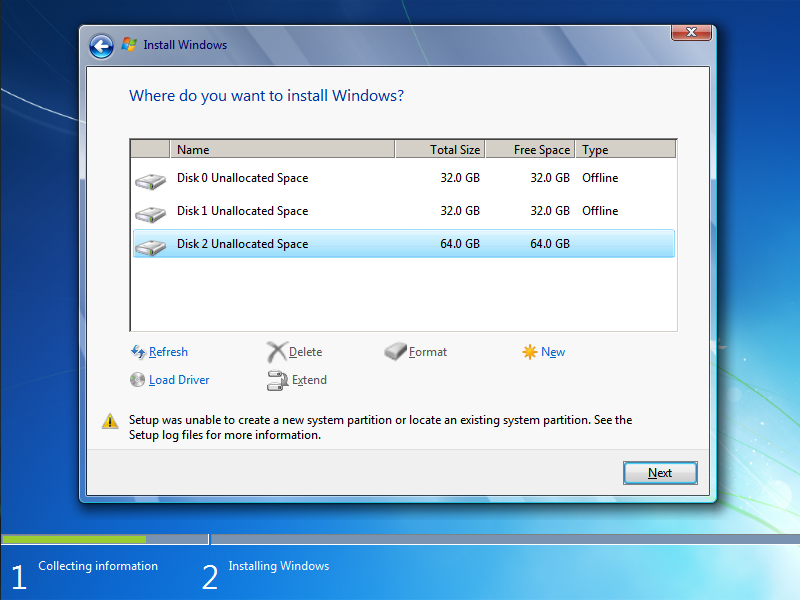
- If there are multiple partitions on the selected drive, you need to delete them to format the installation location. Follow these steps to delete the partitions:
- Click on the Drive Options (advanced) link.
- A list of partitions will be displayed. Select each partition one by one and click on the Delete button.
- Confirm the deletion when prompted.
- Repeat the above steps until all partitions on the selected drive are deleted.
- Once all partitions are deleted, the drive will become unallocated space.
- Now, you need to create a new partition to format the installation location. Follow these steps to create a new partition:
- Select the unallocated space and click on the New button.
- Specify the size for the new partition or use the default maximum size.
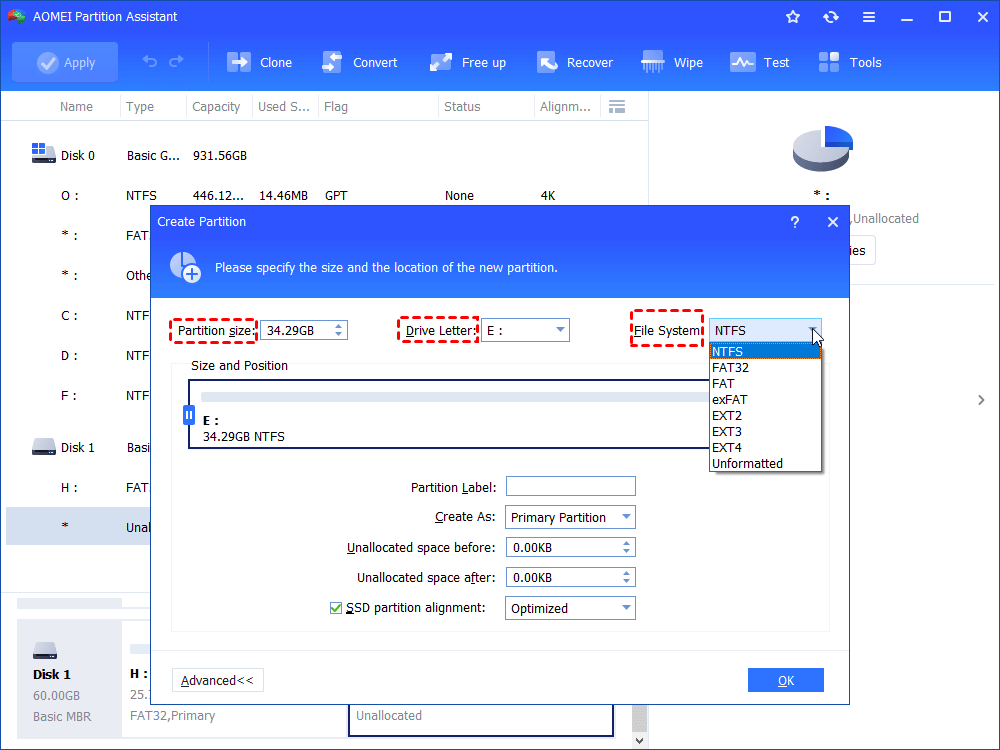
- Click on the Apply button to create the new partition.
- The new partition will be created and displayed as a formatted installation location.
- Continue with the Windows installation process by selecting the newly created partition as the installation location.
- Follow the remaining on-screen instructions to complete the installation.
- Once the installation is finished, the Windows error 0x80300024 should be resolved.
Considering replacing the hard drive if error 0x80300024 persists
If you’re encountering error 0x80300024 during the Windows installation process and it persists, you may need to consider replacing your hard drive. This error code indicates a problem with the hard disk partition and can prevent the installation from completing successfully.
Before proceeding with any hardware changes, it’s important to back up your data to avoid any potential loss. Once you’ve done that, you can try the following steps to troubleshoot the issue:
1. Restart your computer and enter the BIOS settings by pressing the appropriate key (usually displayed during startup).
2. Look for the “Boot” or “Startup” section and ensure that the hard disk is set as the primary boot device.
3. Save and exit the BIOS settings.
4. If the error persists, try connecting the hard drive to a different SATA port on your motherboard or replacing the SATA cable.
5. If none of the above solutions work, it’s advisable to consult with a professional or contact the hard drive vendor for further assistance.
Remember to consult the specific instructions for your computer model and version of Windows for the most accurate troubleshooting steps.

Mark Ginter is a tech blogger with a passion for all things gadgets and gizmos. A self-proclaimed "geek", Mark has been blogging about technology for over 15 years. His blog, techquack.com, covers a wide range of topics including new product releases, industry news, and tips and tricks for getting the most out of your devices. If you're looking for someone who can keep you up-to-date with all the latest tech news and developments, then be sure to follow him over at Microsoft.