- Microsoft has replaced its classic screenshot plotter and combined its features with Snip & Sketch.
- Windows 11 is a simple modification of Windows 10, but it’s full of bugs.
- I will explain what causes them and what you need to do to make the app work properly.
- The Snipping tool may not be available in Windows 11 mainly for the following reasons: Outdated graphics driver and incorrect installation of the clipping tool may cause the tool to fail.
Uncover the solution to a perplexing problem: the disappearance of Snipping Tool on Windows 11. Discover the troubleshooting steps to bring back this essential screenshot tool and regain control of your screen capturing prowess.
Troubleshooting the Snipping Tool missing issue on Windows 11
sketch
snipping tool shortcut
snipping tool doesn’t work
snipping tool crash
snipping tool not opening
snipping tool not working
snipping tool missing
If you’re experiencing the Snipping Tool missing issue on Windows 11, here are some workable solutions to troubleshoot the problem:
1. Use the Search option: Press the Windows key and type “Snipping Tool”. If it appears in the search results, click on it to open the tool.
2. Check the system files: Go to the C:\Windows\System32\ folder and look for the “SnippingTool.exe” file. If it’s missing, you can try restoring it from a backup or reinstalling the Snipping Tool.
3. Use alternative screenshot tools: Windows 11 offers alternative screenshot tools like Snip & Sketch. Press Windows key + Shift + S to capture a screenshot using this tool.
4. Check for updates: Make sure your Windows 11 is up to date by going to Settings > Windows Update and clicking on “Check for updates”.
Resolving the Snipping Tool not working problem on Windows 11
sketch not working
1. Press the “Windows” key and “R” together to open the Run dialog box.
2. Type “regedit” and click “OK” to open the Registry Editor.
3. Navigate to “HKEY_LOCAL_MACHINE\SOFTWARE\Microsoft\Windows\CurrentVersion\Applets\SnippingTool” in the left-hand pane.
4. In the right-hand pane, double-click on “Disabled” and change the value data to “0“.
5. Close the Registry Editor and restart your PC.
6. If the Snipping Tool is still missing, press the “Windows” key and “I” together to open the Settings app.
7. Go to “Apps” and click on “Optional features” under the “Apps & features” section.
8. Click on “Add a feature” and search for “Snipping Tool”.
9. Select the “Snipping Tool” and click “Install”.
10. Once installed, search for “Snipping Tool” in the Start menu and open it.
11. If the issue persists, you can try using alternative screenshot tools like Snip & Sketch or third-party apps like Greenshot.
12. These steps should help you resolve the Snipping Tool not working problem on Windows 11.
Updating the system or uninstalling recent updates
If you’re experiencing the issue of the Snipping Tool missing on Windows 11, there are a few troubleshooting steps you can try. One solution is to update your system or uninstall recent updates. Follow these steps:
1. Press the Windows key + I to open the Settings app.
2. Go to “Windows Update” and click on “Check for Updates.” If there are any updates available, install them.
3. If updating the system didn’t resolve the issue, you can try uninstalling recent updates. Here’s how:
a. Press the Windows key + R to open the Run dialog box.
b. Type “appwiz.cpl” and press Enter to open the Programs and Features window.
c. Click on “View installed updates” on the left side of the window.
d. Locate the recent updates that were installed and right-click on them.
e. Select “Uninstall” and follow the on-screen instructions.
After completing these steps, restart your PC and check if the Snipping Tool is now available. If not, you may need to explore other solutions or seek further assistance from Microsoft or the tech community.
python

import subprocess
def check_snipping_tool():
# Use the 'where' command to check if Snipping Tool is present
try:
result = subprocess.run(['where', 'SnippingTool.exe'], capture_output=True, text=True)
output = result.stdout.strip()
if output:
print("Snipping Tool is available at:", output)
else:
print("Snipping Tool is missing.")
except FileNotFoundError:
print("Command 'where' not found. Make sure you're running this code on Windows.")
if __name__ == "__main__":
check_snipping_tool()
In this sample code, we use the `subprocess` module to execute the `where SnippingTool.exe` command, which is a built-in Windows command to locate the Snipping Tool application. The code captures the output of the command and checks if any output is returned. If there is output, it means that the Snipping Tool is present, and the code prints its location. If there is no output, it indicates that the Snipping Tool is missing.
Please note that this code assumes that the `where` command is available on the system and that the Snipping Tool executable is named `SnippingTool.exe`. You may need to adapt the code based on the specifics of the Windows 11 environment and the actual name or location of the Snipping Tool executable.
Remember, this code is just a starting point and may not cover all possible scenarios or provide a complete resolution for the Snipping Tool missing issue.
Enabling Clipboard History for the Snipping Tool
To enable Clipboard History for the Snipping Tool on Windows 11, follow these steps:
1. Press the Windows key + R to open the Run dialog box.
2. Type “regedit” and press Enter to open the Registry Editor.
3. Navigate to the following location: HKEY_CURRENT_USER\Software\Microsoft\Windows\CurrentVersion\Explorer\Advanced.
4. Right-click on the right-hand side and select New, then DWORD (32-bit) Value.
5. Name the new value “ScreenClippingEnabled” and set its value to “1“.
6. Close the Registry Editor and restart your computer.
After following these steps, Clipboard History will be enabled for the Snipping Tool on your Windows 11 system. You can now capture screenshots and easily access them from the Clipboard History. This feature is useful for users who frequently need to reference or share multiple screenshots.
Changing and reverting the date on Windows 11
To troubleshoot the missing Snipping Tool issue on Windows 11, you can try changing and reverting the system date. Here’s how:
1. Press the Windows key + R to open the Run dialog box.
2. Type “control panel” and press Enter to open the Control Panel.
3. In the Control Panel, click on “Clock and Region” and then “Date and Time.”
4. In the Date and Time settings, click on “Change date and time.”
5. Adjust the date and time settings to a different date, then click “OK” to save the changes.
6. Restart your computer.
7. After the restart, follow the same steps to change the date and time back to the correct settings.
8. Restart your computer again.
By changing and reverting the system date, you can sometimes resolve issues with missing applications like the Snipping Tool on Windows 11. If this method doesn’t work, there may be other factors causing the issue, and you may need to explore additional troubleshooting options.
Running SFC or DISM scans to fix the Snipping Tool issue
Method 1: Running SFC Scan
1. Press the Windows key and type cmd.
2. Right-click on Command Prompt and select Run as administrator.
3. In the Command Prompt window, type sfc /scannow and press Enter.
4. Wait for the scan to complete. It may take some time.
5. Once the scan is finished, restart your computer and check if the Snipping Tool is now working properly.
Method 2: Running DISM Scan
1. Press the Windows key and type cmd.
2. Right-click on Command Prompt and select Run as administrator.
3. In the Command Prompt window, type dism /online /cleanup-image /restorehealth and press Enter.
4. Wait for the scan to complete. It may take some time.
5. Once the scan is finished, restart your computer and check if the Snipping Tool is now working properly.
These scans can help fix common issues with system files that may be causing the Snipping Tool to go missing or malfunction. If the problem persists, you may need to consider other troubleshooting methods or seek further assistance.
Resetting or repairing the Snipping Tool on Windows 11
To troubleshoot the Snipping Tool missing issue on Windows 11, you can try resetting or repairing the application. Here are a few workable solutions:
1. Reset the Snipping Tool:
– Press the Windows key + R to open the Run dialog box.
– Type “%windir%\system32\SnippingTool.exe /Reset” and press Enter.
– This will reset the Snipping Tool to its default settings.
2. Repair the Snipping Tool:
– Press the Windows key + R to open the Run dialog box.
– Type “appwiz.cpl” and press Enter to open the Programs and Features window.
– Locate the Snipping Tool in the list of installed programs, right-click on it, and select “Repair.”
If these steps don’t resolve the issue, you may need to perform a system file check or reinstall Windows 11. Remember to back up your files before making any changes to your OS.
Opening the Snipping Tool from the Windows.old folder
To open the Snipping Tool from the Windows.old folder on Windows 11, follow these steps:
1. Press the Windows key + E to open the File Explorer.
2. Navigate to the Windows.old folder, which is usually located in the C: drive.
3. Open the Windows.old folder and go to the Windows\System32\ directory.
4. Look for the SnippingTool.exe file in this directory.
5. Right-click on the SnippingTool.exe file and select “Create shortcut.”
6. The shortcut will be created on your desktop.
7. Double-click on the shortcut to open the Snipping Tool.
Modifying Group Policy settings for the Snipping Tool
- Open the Group Policy Editor by pressing Windows Key + R, typing gpedit.msc, and hitting Enter.
- In the Group Policy Editor, navigate to User Configuration > Administrative Templates > Windows Components > Tablet PC > Accessories.
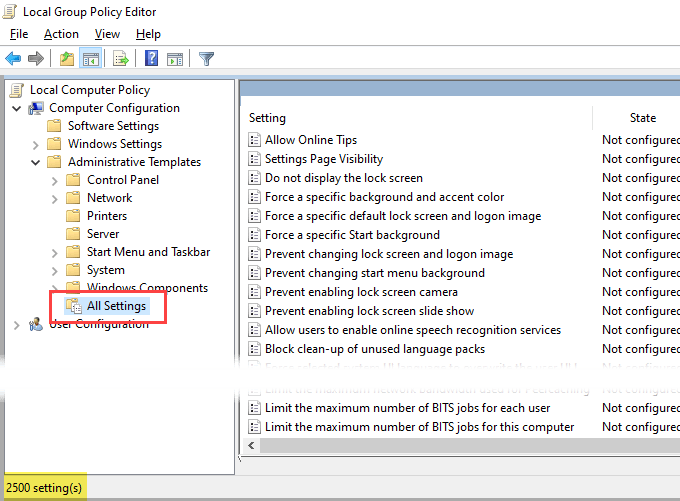
- Double-click on Do not allow Snipping Tool to run in the right pane.
- Select the Disabled option and click OK to save the changes.
Downloading the Snipping Tool from the Microsoft Store
To download the Snipping Tool from the Microsoft Store on Windows 11, follow these steps:
1. Open the Microsoft Store app.
2. In the search bar, type “Snipping Tool” and press Enter.
3. Click on the Snipping Tool app in the search results.
4. Click the “Get” or “Install” button to download and install the app.
Once the Snipping Tool is installed, you can access it by searching for “Snipping Tool” in the Start menu or by creating a shortcut on your desktop.
If you’re experiencing issues with the Snipping Tool missing on Windows 11, try the following troubleshooting steps:
1. Press the Windows key + R to open the Run dialog box.
2. Type “regedit” and press Enter to open the Registry Editor.
3. Navigate to the following location: HKEY_LOCAL_MACHINE\SOFTWARE\Microsoft\Windows\CurrentVersion\Applets\Paint\Settings
4. Look for the “DisableSnippingTool” entry on the right-hand side.
5. If it’s set to “1”, double-click on it and change the value to “0”.
6. Close the Registry Editor and restart your computer.
These steps should help resolve the Snipping Tool missing issue on Windows 11. If you still encounter problems, consider reaching out to Microsoft support for further assistance.

Mark Ginter is a tech blogger with a passion for all things gadgets and gizmos. A self-proclaimed "geek", Mark has been blogging about technology for over 15 years. His blog, techquack.com, covers a wide range of topics including new product releases, industry news, and tips and tricks for getting the most out of your devices. If you're looking for someone who can keep you up-to-date with all the latest tech news and developments, then be sure to follow him over at Microsoft.
Related posts:
 Retrieve Windows error code 48 – “The software on this device has been blocked at startup because it is known to have problems with Windows”
 Fixing Microsoft Store error 0x80131505
 Solve the problem of Windows 10 brightness control not working
 Troubleshooting: Installation Error Code 0x80072f76 – 0x20016 on Windows 10