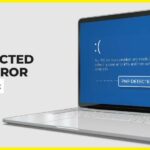
- The video_scheduler_internal_error can occur when browsing the Internet or using certain programs on your Windows computer.
- It can occur anytime you are working on something important or watching a movie, but when this error occurs, you will not be able to save your work in the system.
- After your computer restarts, download and install the latest video card driver from the Windows Download Center.
Unraveling the Enigma: Resolving the Video Scheduler Internal Error in Windows 10/11
Understanding Video Scheduler Internal Error in Windows 10
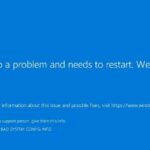
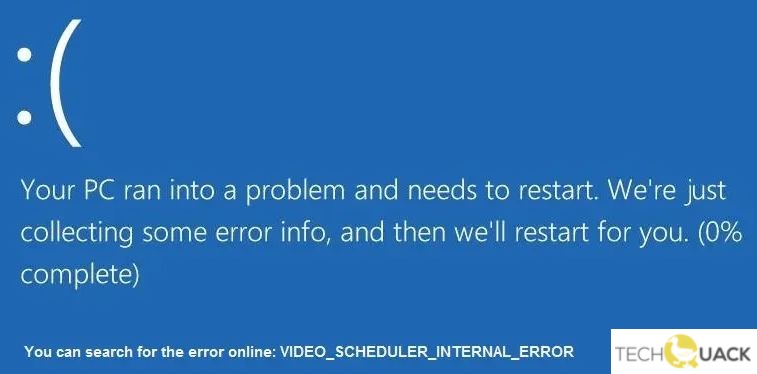
When encountering the Video Scheduler Internal Error in Windows 10/11, it can be frustrating and disruptive. This error, also known as the “video_scheduler_internal_error” or the “BSOD video scheduler error,” typically manifests as a blue screen with a stop code error.
There are a few potential reasons for this issue, including driver problems, corrupted files, or hardware damage. To resolve it, there are several methods you can try.
Method 1: Update your video drivers. Outdated or incompatible drivers can often cause this error. Visit the manufacturer’s website to download and install the latest drivers for your graphics card.
Method 2: Check for corrupted system files. Open the Command Prompt as an administrator and run the “sfc /scannow” command to scan and repair any corrupted files.
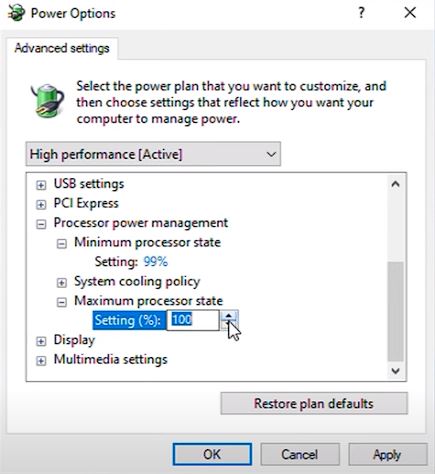
Method 3: Disable hardware acceleration. This can help troubleshoot issues related to video playback and improve system stability. Go to Settings > System > Display > Graphics settings and toggle off hardware acceleration.
By following these steps, you should be able to fix the Video Scheduler Internal Error and get back to enjoying your computer without any interruptions.
Quick Fixes for Video Scheduler Internal Error
- Restart your computer: Sometimes a simple restart can resolve the Video Scheduler Internal Error.
- Update your graphics drivers: Outdated or incompatible graphics drivers can cause this error. Visit the manufacturer’s website or use Windows Update to install the latest drivers.
- Run the Windows Hardware and Device Troubleshooter: This built-in tool can help identify and fix issues related to hardware and devices.
- Check for Windows updates: Ensure that your Windows operating system is up to date, as Microsoft often releases patches and fixes for known issues.
- Disable overclocking: If you have overclocked your GPU or CPU, try reverting them to their default settings.
- Scan for malware: Run a full system scan using a reliable antivirus program to check for any malicious software that might be causing the error.
- Check hardware connections: Ensure that all hardware components are properly connected. Reseat your graphics card, RAM modules, and other peripherals if necessary.
- Run the System File Checker (SFC) utility: This tool can scan and repair corrupted system files that may be triggering the Video Scheduler Internal Error.
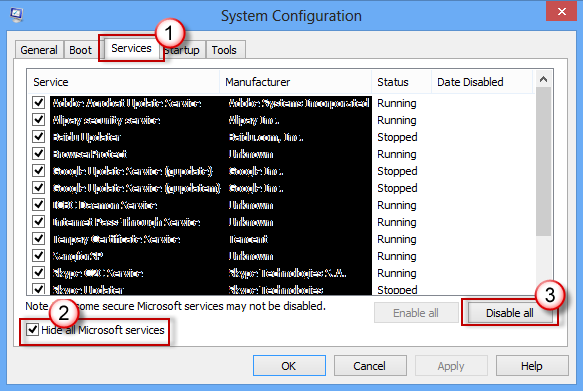
- Perform a clean boot: Temporarily disable all non-Microsoft services and startup programs to determine if any third-party software conflicts are causing the issue.
- Restore your system to a previous working state using System Restore: If the error started occurring after a recent software installation or system change, reverting to an earlier state may help.
cpp

#include

#include
int main() {
try {
// Your application logic here
// Simulating the video_scheduler_internal_error exception
throw EXCEPTION_VIDEO_SCHEDULER_INTERNAL_ERROR;
}
catch (DWORD exceptionCode) {
if (exceptionCode == EXCEPTION_VIDEO_SCHEDULER_INTERNAL_ERROR) {
std::cout << "Caught video_scheduler_internal_error exception." << std::endl;
// Handle the exception appropriately
}
else {
std::cout << "Caught some other exception." << std::endl;
// Handle other exceptions if needed
}
}
catch (...) {
std::cout << "Caught an unknown exception." << std::endl;
// Handle unknown exceptions if needed
}
return 0;
}
In this example, we use a try-catch block to catch the "video_scheduler_internal_error" exception, represented by the `EXCEPTION_VIDEO_SCHEDULER_INTERNAL_ERROR` constant. You can replace the "Your application logic here" comment with your actual application code. When the exception occurs, the catch block will execute and you can handle the exception accordingly.
Please note that this code is a simplified example and may not reflect a real-world scenario. Handling system-level errors like "video_scheduler_internal_error" often requires deeper knowledge of the Windows operating system and specialized debugging techniques.
Run CHKDSK to Check Hard Drive Errors
To fix the Video Scheduler Internal Error in Windows 10/11, running CHKDSK can help identify and resolve hard drive errors. Follow these steps:
1. Press the Windows key + X and select "Command Prompt (Admin)".
2. In the Command Prompt, type chkdsk C: /f and press Enter. Replace "C:" with the appropriate drive letter if needed.
3. You will be prompted to schedule the disk check at the next restart. Type "Y" and press Enter.
4. Restart your computer.
After the restart, CHKDSK will scan and fix any errors on your hard drive. This can help resolve issues causing the Video Scheduler Internal Error and prevent further problems. Remember to backup your important data before performing any disk checks or repairs.
If the problem persists, consider updating your video drivers or seeking further assistance from Microsoft support.
Perform an SFC Scan to Check Windows System Files
If you are experiencing the Video Scheduler Internal Error in Windows 10/11, one possible solution is to perform an SFC Scan to check for any issues with your system files.
To do this, follow these steps:
1. Press the Windows key + X and select "Command Prompt (Admin)" or "Windows PowerShell (Admin)".
2. In the command prompt window, type sfc /scannow and press Enter.
3. The scan will now begin, and it may take some time to complete. Do not interrupt the process.
4. Once the scan is finished, you will receive a message indicating if any issues were found and if they were successfully repaired.
5. Restart your computer and check if the Video Scheduler Internal Error persists.
Performing an SFC Scan can help identify and fix any corrupted or missing system files that may be causing the error. It is a simple and effective method to troubleshoot Windows system issues.
Update Graphics Card Driver
To fix the Video Scheduler Internal Error on Windows 10/11, updating your graphics card driver can often resolve the issue. Here's how you can do it:
1. Identify your graphics card: Open Device Manager by right-clicking on the Start button and selecting it from the list. Expand the Display adapters category to find your graphics card.
2. Download the latest driver: Visit the manufacturer's website or use Windows Update to download the latest driver for your graphics card. Make sure to download the correct driver version for your operating system.
3. Uninstall the current driver: In Device Manager, right-click on your graphics card and select "Uninstall device." Check the box that says "Delete the driver software for this device" and click Uninstall.
4. Install the new driver: Run the driver installation file you downloaded and follow the on-screen instructions to install the new driver.
5. Restart your computer: After the driver installation is complete, restart your computer to apply the changes.
By updating your graphics card driver, you can potentially resolve the Video Scheduler Internal Error and prevent future occurrences of the blue screen error.
Install Windows Updates
To fix the Video Scheduler Internal Error in Windows 10/11, installing Windows updates can help resolve the issue. Follow these steps:
1. Open Windows Update: Go to the Start menu and search for "Windows Update." Click on the "Windows Update settings" option.
2. Check for updates: Click on the "Check for updates" button. Windows will search for available updates.
3. Install updates: If any updates are found, click on the "Install" button to start the installation process. Make sure your internet connection is stable during this process.
4. Restart your PC: After the updates are installed, restart your computer to apply the changes.
Installing Windows updates can address various issues, including the Video Scheduler Internal Error. By keeping your system up to date, you can ensure better functionality and security.
If you continue to experience the Video Scheduler Internal Error, you may need to consider other troubleshooting methods or consult with a technical expert.
Reinstall Graphics Card
To reinstall your graphics card and fix the Video Scheduler Internal Error in Windows 10/11, follow these steps:
1. Uninstall the current graphics card driver:
a) Press Windows + X and select Device Manager.
b) Expand the Display adapters category.
c) Right-click on your graphics card and select Uninstall device.
d) Check the box that says "Delete the driver software for this device" and click Uninstall.
2. Physically remove the graphics card:
a) Shut down your computer and unplug it from the power source.
b) Open the case and locate the graphics card.
c) Gently remove the card from its slot.
3. Reinstall the graphics card:
a) Insert the card back into the slot, ensuring it is properly seated.
b) Close the case and plug in your computer.
c) Start your computer and let Windows automatically install the default graphics driver.
4. Update the graphics card driver:
a) Press Windows + X and select Device Manager.
b) Expand the Display adapters category.
c) Right-click on your graphics card and select Update driver.
d) Choose the option to search automatically for updated driver software.
5. Restart your computer:
a) After the driver update is complete, restart your computer to apply the changes.
Following these steps should help resolve the Video Scheduler Internal Error. If you continue to experience issues, consider seeking further assistance from our support team or visiting our blog for additional troubleshooting solutions.
Perform a Factory Reset
Performing a factory reset can help resolve the Video Scheduler Internal Error in Windows 10/11. Follow these steps to reset your device:
1. Backup your data: Before proceeding with a factory reset, ensure that you have backed up all your important files and data to prevent any loss.
2. Access the Recovery menu: Restart your computer and repeatedly press the designated key (usually F11 or F12) to access the Recovery menu.
3. Choose Reset this PC: In the Recovery menu, select "Reset this PC" to begin the factory reset process.
4. Select Keep my files: You will be prompted to choose between keeping your personal files or removing everything. Select the option that suits your needs.
5. Follow the on-screen instructions: Windows will guide you through the rest of the process. Make sure to read and follow the instructions carefully.
By performing a factory reset, you can resolve the Video Scheduler Internal Error and restore your device to its default settings. Remember to reinstall any necessary applications and update your drivers after the reset to ensure full functionality.
Fixing Annoying BSOD Errors for Good
If you're tired of dealing with annoying BSOD errors, particularly the Video Scheduler Internal Error in Windows 10/11, we've got you covered with some helpful solutions.
First, make sure your drivers are up to date. Update your graphics drivers by visiting the manufacturer's website or using a reliable driver update tool.
Next, scan your system for malware using Windows Security or a reputable antivirus program. Malware can cause various errors, including the Video Scheduler Internal Error.
If you recently installed any new software or hardware, try uninstalling or removing it to see if that resolves the issue. Sometimes incompatible programs or drivers can trigger BSOD errors.
Another common reason for the Video Scheduler Internal Error is corrupted system files. You can use the built-in System File Checker tool to scan and repair any damaged files.
Lastly, if none of the above solutions work, it's recommended to perform a clean installation of Windows. This will help eliminate any underlying software or driver problems that may be causing the error.
By following these steps, you can say goodbye to the frustrating Video Scheduler Internal Error and enjoy a smoother Windows experience.

Mark Ginter is a tech blogger with a passion for all things gadgets and gizmos. A self-proclaimed "geek", Mark has been blogging about technology for over 15 years. His blog, techquack.com, covers a wide range of topics including new product releases, industry news, and tips and tricks for getting the most out of your devices. If you're looking for someone who can keep you up-to-date with all the latest tech news and developments, then be sure to follow him over at Microsoft.